Fitting It All Together: Strategies to Organize Your Writing
Melissa Helquist
Writing can be overwhelming. Sometimes it’s hard to imagine how all of your ideas and research can fit together into a coherent whole, especially when you’re working on a longer, more complex argument or discussion. When you have a lot of great ideas but aren’t sure how to put them all together, you can experience writer’s block.
This article aims to give you a few specific strategies to help you manage complex writing tasks so that they don’t feel so unapproachable. You may find that one strategy fits your preferences and needs more than another, but don’t be afraid to try a range of approaches. Often, you’ll need different strategies to accomplish different tasks; having a variety of tools in your toolbox can give you options when one approach just isn’t working.
Traditional Outlines
Outlines are a common way to plan out a writing project. Outlines are essentially blueprints of an essay, identifying the main points of your essay and their most effective order. You can also use outlines to sketch out specific sections of your essay. With outlines, you want to sketch out not only the content you’ll use in your essay but also the relationship between ideas and examples.
To create an outline, first answer the following questions:
- What is your thesis or argument?
- What key ideas or points help to support your thesis?
- What background information will your readers need to understand your ideas?
- What sources, examples, etc., help to support each of your ideas?
- How do you want to present your ideas? According to categories? Least to most important? Chronologically, etc.
Once you’ve sketched out your basic ideas, you’ll put them into order by assigning numbers, letters, or heading styles to different levels of organization. For instance, you might list major points in the essay with capital letters (e.g., A, B, C), and secondary points with numbers (e.g., 1, 2, 3). If you need to sub-divide those secondary points, you can use lowercase letters (e.g., a, b, c). With this approach, an outline might look something like Figure 1.

If you create your outline in a word processing program like Word or Google docs, try applying heading styles to your key points (for example, you can use Heading 1 for your title, Heading 2 for major points, Heading 3 for secondary points, etc.). If you apply these styles, you can switch back and forth between an outline view and a content view to help you easily develop and restructure content (see Figure 2).
Reverse/Descriptive Outlines
Sometimes your ideas are a jumble and creating an outline feels too challenging, or you just may not be the outlining type. If you’re in this situation, you can create a reverse (or descriptive) outline. This process allows you to create and adjust an outline based on what you’ve already written.
To create a reverse outline, first start writing. Draft as much of your content as you can, but don’t worry too much about how different sections fit together. Once you’ve written as much as you can, give yourself a break. It’s a good idea to create some space between your drafting and outlining processes. Once you’ve taken a break from your draft (a full day is a good idea if your schedule allows), follow this process to create an outline from what you’ve written:
1. Read through your drafted text. For each paragraph, note down two pieces of information:
- What the paragraph does (e.g., introduces the argument, compares two sources, etc.)
- What the paragraph says (i.e., content, examples, data, etc.)
2. Once you’ve made these notations, scan through your notes and look for overlaps, gaps, etc. Are there multiple paragraphs about the same idea? If so, move them together. Are any sections missing?
3. Once you’ve annotated and analyzed your draft, create a traditional outline that shows how you would like to reshape and develop your draft. Use this outline to help you revise your draft.
Cut-ups
Another way that you can revise and develop a draft’s organization is by using a hands-on process called cut-ups. We’re used to copying and pasting text in word processing programs like Word, but sometimes it can help to be a little more hands on and cut and paste with a printed document and scissors.
First, write out a draft. As with the reverse outline process, you don’t need to worry too much about how ideas fit together, if you cover everything, etc. Just get your ideas written down as fully as you can.
Print out your draft and cut up the pages so that each paragraph is on its own slip of paper. Lay these paragraph slips out on a flat surface (a table, the floor, etc.). Move the slips of paper/paragraphs around and see if you find any new ideas, clearer connections, etc. when you change the draft’s structure. When you get an order that you like, you can tape everything back together and/or make the same changes in your word processor draft.
You can also use the cut-ups process to help you arrange and develop the structure of individual paragraphs, by cutting apart and rearranging the sentences that make up each paragraph.
Graphic Organizers
In addition to the outlining ideas we’ve already explored, you can also get a better sense for how your ideas fit together using a range of graphic organizers or visualization tools. These organizational tools can be useful if you prefer working with visual content or if you just want to try a different approach. Some graphic organizers are essentially outlines presented with symbols instead of numbered, hierarchical lists. You can find many graphic organizer templates online, but you can create one by putting together basic shapes to show content and arrows to show relationships.
A few additional graphic organizers you might try out are Venn Diagrams, Storyboards, and Timelines.
Venn Diagrams
Venn diagrams use overlapping circles to help show relationships between ideas, arguments, authors, etc. To create a Venn diagram, first identify key concepts that you would like to compare (this might be key sections of your content, specific sources, etc.). Venn diagrams typically compare two or three things; the example included here focuses on comparing two things.
Once you have decided what you want to compare, create the basic Venn diagram by drawing two intersecting circles (you can also find lots of templates online). Label each circle with the concepts you are comparing. Under each circle’s label, make a list of notes and ideas. For instance, if you are comparing two ideas you want to discuss in your paper, you can list key sources, focal points, timeframes, etc. List notes for each side of the circle and then move anything that is common between the two to the overlapping segment of the circles.
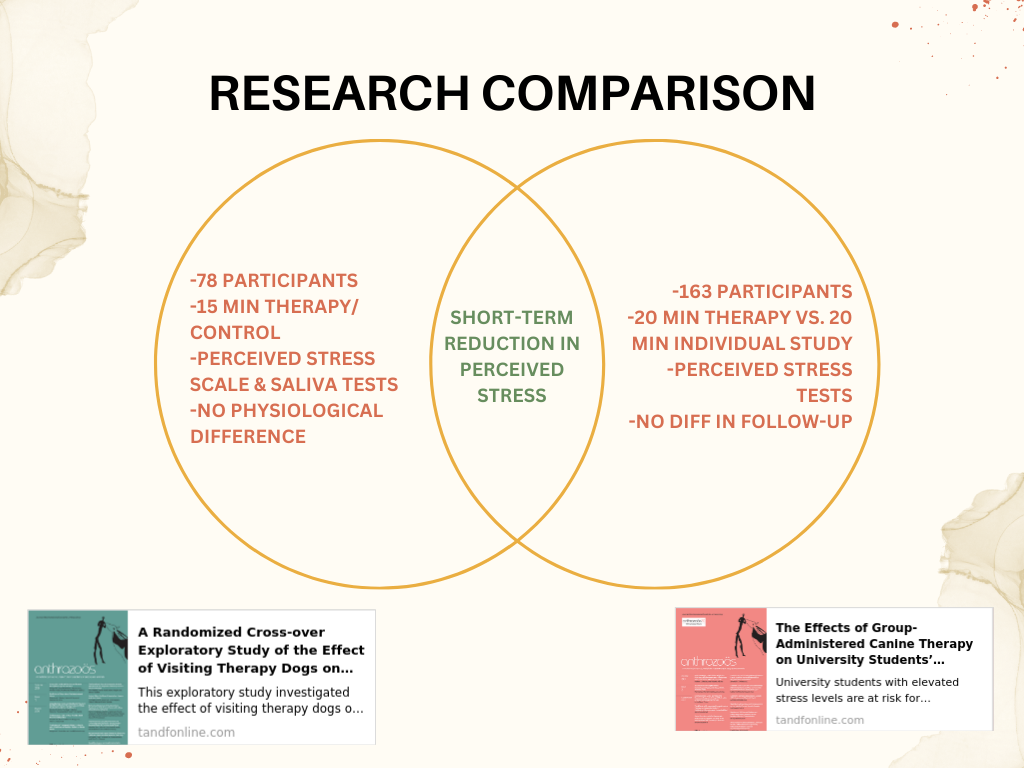
Going through the process of creating a Venn diagram can help you understand where sources might connect and how you can integrate their ideas within a paragraph, or it might help you understand how key ideas are related and how you might use similarities to create transitions between those ideas.
Storyboards
A storyboard is essentially a visual outline. While storyboards are typically used to plan out video content, they can provide a helpful visualization for written content as well. To create a storyboard, add a series of panels/boxes to a blank page. Add images, text, etc. to each panel to show how your essay’s ideas might develop. You can use visual clues and key words to help you identify transitions relationships between ideas, sources, and sections.
Timelines
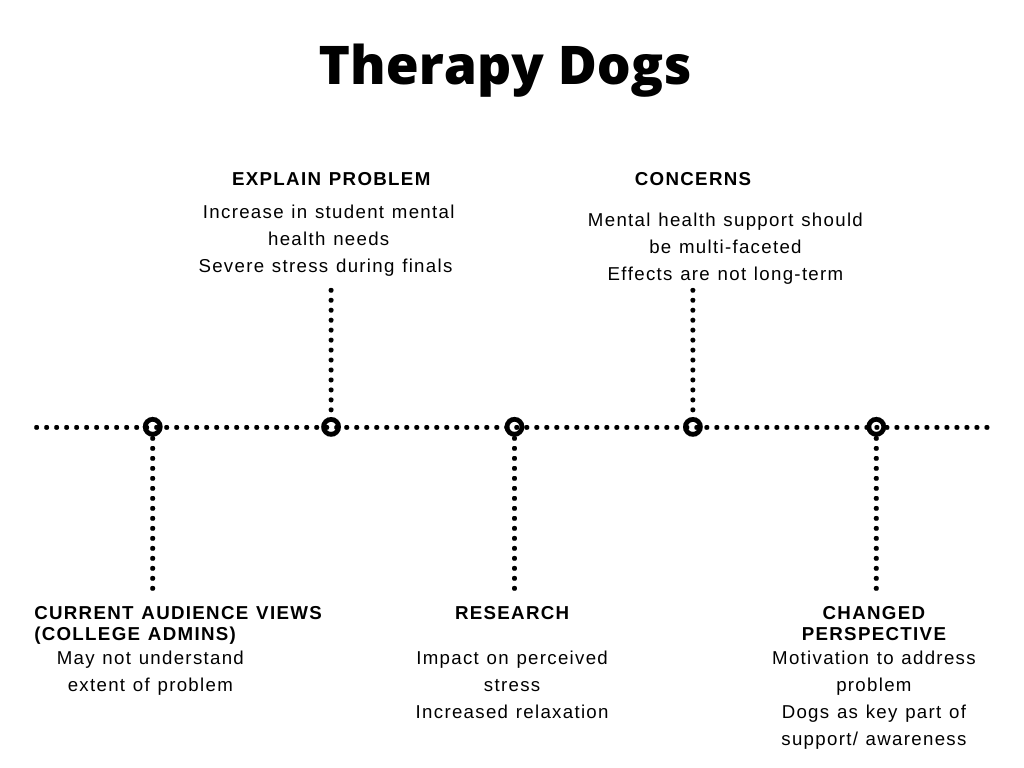
Timelines are especially helpful if you are working with a chronological idea (e.g., the development of community colleges in the U.S.), but they can also help you plan out the progression of ideas in any essay. Consider the following approach to create an organizational timeline:
- Begin the timeline with your audience’s current perspective. What do they know about your topic? What interest do they have in your topic?
- End the timeline with a description of your audience once they’ve read your argument. How do you want them to think, feel, or act differently once they’ve read your essay?
- Once you’ve noted the starting and ending points, mark the steps along the way. What information does your audience need to reach the destination you have in mind? What ideas need to come first?