
Muscle Twitch (DEMONSTRATION)
Warning: Before connecting the IXTA stimulating electrodes to the subject, check the Stimulator Control Panel to make sure the amplitude value is set to zero.
Note: Disconnect the subject from the IXTA prior to powering off the device.
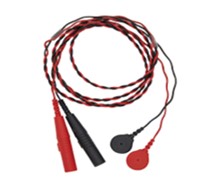
The IXTA stimulating electrodes.

The front panel of the IXTA with the stimulating electrodes connected correctly. The Twitch sensor is plugged into channel A7.
- The IXTA should be closed to the subject.
- The student should remove all jewelry before beginning the activities.
- The color-coded stimulator lead wires should be connected to the High Voltage Current Stimulator. Verify that the safety connector of each lead wire is connected into the appropriate socket as far as possible.
- The SMT-220 (muscle transducer) should be plug into channel A7 on the front of the TA.
Positioning of the Stimulating Electrodes
- Obtain a couple of disposable electrodes. Attach one electrode to the center of the back of the hand. The electrode should be half the way between the first knuckle of the middle finger and the wrist. This electrode is the positive (red) stimulating electrode.
- Attach the second electrode about one centimeter above the lateral edge of the hand, half way between the first knuckle of the finger and the wrist. This electrode is the negative (black) stimulating electrode.
- Snap the ends of the high voltage current stimulator output lead wires onto the stimulating electrodes, so that:
- The red (+) lead is snapped on the electrode in the center of the back of the hand,
- The black (-) lead is snapped on the electrode at the lateral edge of the hand.
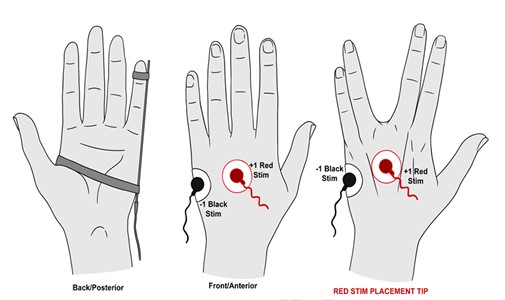
A placement of the stimulating electrodes on the left hand.
- The Muscle Stimulator generates a signal only when flexed in one direction. Locate the label on the sensor that indicates the side of the sensor that will need to face outwardly from the finger.
![]()
The SMT-220 muscle transducer with a label indicating the side of the sensor that faces to the outside.
- Align the Muscle Stimulator along the side of the little finger so the outside of the sensor is oriented away from the finger. Use a Velcro strap to attach the tip of the sensor to the end of the little finger. Use a longer Velcro strap to attach the base of the sensor along the lateral edge of the palm of the hand.
- Check the values for the stimulus parameters that are listed in the stimulator control panel on the Main window:
- Pulse amplitude (Amp): 0 V or mA
- Pulse width (W): 5 ms
- Frequency (F): 1 Hz
- Number of pulses (#pulses): 15
Click the Apply button to finalize the changes.
- Click Record and then click FIRE on the stimulator control panel. There should be no response from the subject’s finger since the current output is zero. Continue to record.
Note: As the current output is increased in the next couple of steps, ask the subject to indicate when they first feel any tingling under the negative stimulating electrode. Minor movement of the subject’s finer can usually be seen when the stimulus current is raised another milliamp or two.
For each “1” amplitude increase it is equal to a current output of 2 milliamperes. Remind the subject to indicate the first occurrence of tingling. If no finger movement is seen, the stimulus current is below the threshold current of most sensitive muscle fibers controlling the finger’s movement.
Note: The amplitude required to cause a finger twitch will differ between subjects. Some subjects require as low as 2.5 milliamperes of current (1.25 amplitude) to create a maximum response, while other subjects may require 7 or more milliamperes (3.5 or more amplitude) to create the strongest response.
- If a finger twitch does not occur at 2 mA, change the Amplitude by an additional 0.5. Click the Apply button. Check for tingling and finger movement. Increase the current output in increments of 0.5 until the subject’s finger twitches with the largest range of motion.
Note: the pinkie may not twitch, and another finger will twitch. If this happens, just move the twitch sensor to the finger that is actively twitching. It can be any finger and does not need to be the pinkie.
- Find the lowest stimulus current that creates the largest twitch from the subject’s finger, click Stop to turn off the stimulator.
The IXTA can generate up to 100 Volts, the current delivered by the unit is limited to a maximum of 20 milliamperes, for a maximum duration of 10 milliseconds per pulse, and a maximum frequency of 50 pulses per second (Hz). At these levels, the maximum amount of powered delivered by the IXTA will not cause injury or tissue damage. For example, if a pulse from the IXTA is programmed for a duration of 1 millisecond and a frequency of 1 Hz, the stimulator will generate a stimulus pulse with the same duration and frequency.
Activity 1
- Instruct the subject to relax and place the hand that is used for the experiment on the bench, with its palm up.
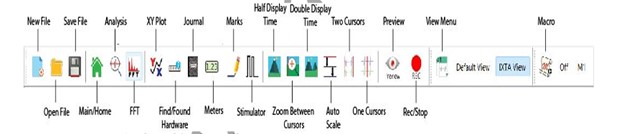
- Click the Stimulator Preferences icon on the LabScribe toolbar to open the stimulator control panel if it does not open automatically.

- Check the values for the stimulus parameters that are listed in the stimulator control panel on the Main window:
- Pulse amplitude (Amp): this is the level determined in the Setup section (the lowest stimulus current that creates the largest twitch)
- Pulse width (W): 5 ms
- Frequency (F): 1 Hz
- Number of pulses (#pulses): 15

Activity 2
Students will monitor the contraction and relaxation of the finger twitch in relation to the stimulus frequency.
- Remind the subject to relax and place the hand that is used for the experiment on the table, with the palm up.
- Check the stimulus parameters set in the stimulator control panel. The duration of the stimulus pulses should be 5 milliseconds (ms), their frequency should be 1 Hz, and the number of pulses should be set to 40.
- During the course of this activity, the stimulus frequency will be changed to demonstrate summation and tetanus. After any stimulus parameters is change, click the Apply button on the Stimulator control panel to make the change. Click Fire to fire the stimulation.
- Set the stimulus current to the maximal level as used in Activity 1.
- Type 1 Hz in the Mark box. Click Record and click the mark button. Do not stop the recording. There should be forty twitches on the recording.
- Change the stimulus frequency to 2 Hz. Click the Apply button to put any frequency change into effect.
- Repeat Step 5 with the stimulus frequency set to 2, Type 2 in the Mark box. When the subject is ready – click Fire.
- Repeat Step 7 for stimulus frequencies of 3, 4, 5, and then 10, 15, and 20 Hz. Remember to click the Apply to make the changes and Fire to send the stimulation.
- When performing the activity at the highest frequency (20 Hz) keep recording after complete tetanus is reached. Continue to record for at least 10 seconds as the tension in the muscles of the finger begins to relax.
- When the muscles in the finger are fully relaxed, click Stop to halt the recording.

IWorx Systems. 2024. Experiment HM-4: Stimulus Response, Work, Summation, and Tetanus in Human Muscle. IWorx Systems, Inc.
