
9.2 Lab Protocol
Approximate Time: 3 hours
Learning Objectives
-
- Respiration Function and Steps: Understand the function and the five steps of respiration.
- Spirometry: Learn and perform the process of spirometry, and understand the various parameters it measures.
- Lung Capacities and Volumes: Understand and measure different lung capacities and volumes.
- Exercise and Respiration: Understand how exercise affects respiration.
- POPS Project: Students will collaborate on the Results for peer editing.
“This material is adapted from iWorx Systems Inc with permission.”
Equipment Required
IXTA, and power supply for IXTA
A-FH-300L Spirometer flow head and plastic tubes
A-SRK student respiratory kit (blue filter, disposable cardboard mouthpiece, nose clip) – this is a single-student test/session use. When done with lab, please discard them away.
It is important that the volunteer is healthy and has no history of respiratory or cardiovascular problems.
Setup
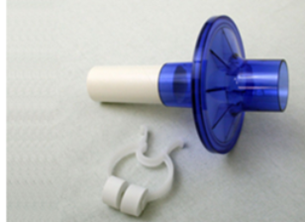
- On your table, find a new disposable respiratory kit (Figure 1A) and open it.
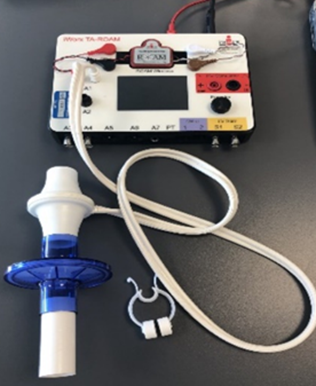
- Attach the blue filter to one side of the flow head, then connect the mouthpiece to the other side, as shown in Figure 1B.
1A.
1B.
Figure 1: Spirometer Setup: A. The student respiratory kit. B. The flow head connected to the internal spirometer of the IXTA unit. (Figure by iWorx)
Before Starting
- Please read the procedures for each exercise completely before beginning the lab. You should have a good understanding of how to perform these lab exercises before making recordings.
- The spirometer will monitor breathing from a subject. It is important that the subject is healthy and has no history of respiratory or cardiovascular problems.
- The outlets connected to the airflow tubing should always be pointed up to avoid problems with condensation developing within the tubing.
- To reduce turbulence, the subject should place their lips around the cardboard mouthpiece attached to the flow head.
- Use a nose-clip to prevent air from entering or leaving the nose as the subject is breathing. Air passes through the nose causes errors in the lung volume values.
Start the Software
- Turn on the iWorx TA-ROAM box
- Click the Labscribe25 icon on the computer screen.
- A default mode box will appear, click OK. A pop-up box should appear indication that the iWorx IX-TA ROAM (hardware) has been found, click.
- When the program opens, Click on Settings on the toolbar on top. Select Load Group – select IPMv7Complete.iwxgrp and click Ok.
- If you don’t see this file, click on Complete Settings folder, then scroll down
- Click settings, Select Human Spirometry and then Breathing-Rest Exercise
- LabScribe will appear on the computer screen as configured by the Human Spirometry settings.
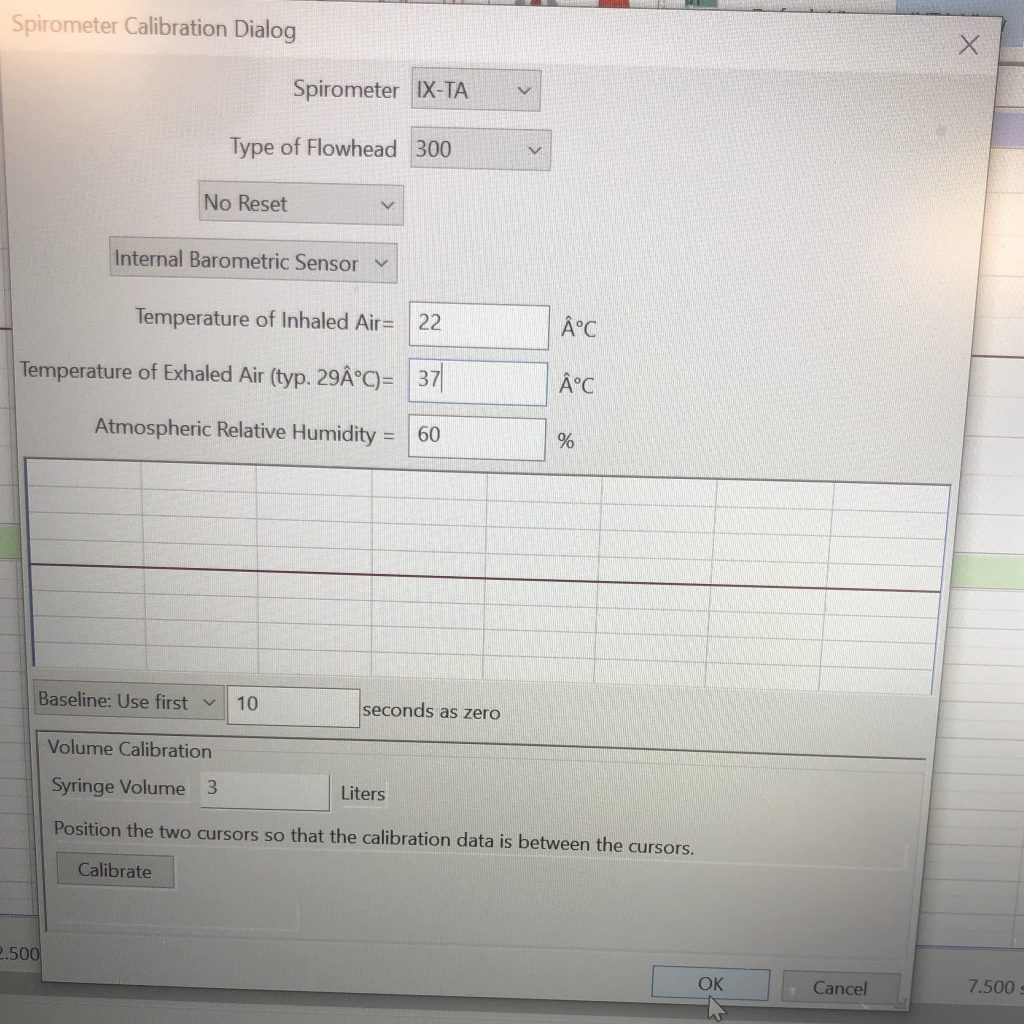
- Check the calibration of your spirometer on the Lung Volume channel:Click on the words STPD Human (Air Flow), that are next to the title of the Lung Volumes channel, to open the computed function pull-down menu.Select Setup Function from the drop-down menu to open the Spirometer Calibration dialog window. Ensure that the displayed numbers match those in the image below. Click Calibrate and then Ok.
7. Allow the IXTA to warm up for 10 minutes before recording for the first time.
Activity 1: Breathing While Resting
Aim: to measure breathing parameters in a healthy, resting subject.
Approximately Time: 20 minutes
Procedure
- Instruct the subject to:
- Sit quietly and become accustomed to breathing through the spirometer flow head.
- Make sure the subject is breathing through the red port side of the flow head (red mark on the flow head).
- Breathe normally before any recordings are made.
- Hold the flow head so that its outlets are pointed up.
- Remove the flow head from his or her mouth and hold it at the mouth level in a position that prevents a breath from moving through the flow head.
Note: The LabScribe software will zero the Lung Volumes channel during the first ten seconds of recording. No air should be moving through the flow head during this time.
- Type Resting in the Mark box.
- Click Record. After waiting at least 10 seconds for the Lung Volumes channel to zero, have the subject place the flow head in his o her mouth and begin breathing. Click the mark button to mark the recording.
- Click the AutoScale All button. Notice the slowly moving wave on the Lung Volumes channel. Record five-six breaths, which normally takes about forty-five seconds to record.
- Type Forced in the Mark box. Click the mark button as the subject inhales as deeply as possible. After reaching his or her maximum inhalation volume (do not hold it in), the subject should exhale as quickly as possible. Then do another inhale before returning to breathing normally. Make sure to blow all the air out of the maximum exhale.
- After the forced exhalation is complete, the subject should continue to breathe normally through the spirometer for three breath cycles.
- Click Stop to halt recording. Your data may look like the image below (Fig 2). If you see a flat line during inhalation, it likely means you are holding your breath. To correct this, repeat the procedure, ensuring you inhale as deeply as possible and exhale forcefully and quickly as possible.
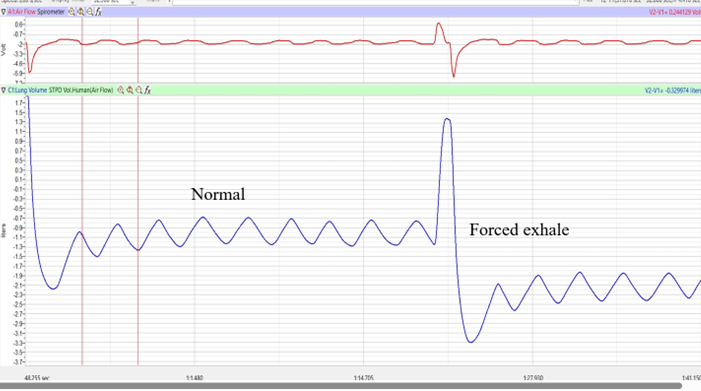
Figure 2. Air flow and lung volumes of the normal and forced breathing of the subject at rest.. (Figure by iWorx)
Data Analysis-Normal Breathing at Rest
-
-
- Using the Lung Volume Channel (green bar) record the following: (Use Figure 3 for Reference)
Tidal Volume (TV), which is the volume of air inhaled or exhaled during a normal breathing cycle. Place one cursor in the through prior to inhalation, and the second cursor on the peak of the cycle. The value for the V2-V1 function on the Lung Volumes channel is the tidal volume. Convert the value into milliliters. Enter the value in Table 1.
Inspiratory Reserve Volume (IRV), by placing one cursor on the peak of the normal breath prior to the maximum inhalation and the second cursor on the peak of the forced breath cycle. The value for V2-V1 function on the Lung Volumes channel is the inspiratory reserve volume. Enter the value in Table 1.
Expiratory Reserve Volume (ERV), by placing one cursor in the trough before maximal inhalation and the second cursor on the flat line after subject has expelled all the air from their lungs. The value for the V2-V1 function on the Lung Volumes channel is the expiratory reserve volume. Enter the value in Table 1.
Calculate the Forced Vital Capacity using the following formula. Enter the value in Table 1.
FVC = VT + IRV + ERV
Forced Expiratory Volume at 1 Second (FEV1), by placing one cursor on the peak of the maximum inhalation and the second cursor on the data point that is one second after the peak. Use the T2-T1 function (click on analysis icon to see this number) to determine the data point that is one second after the peak. The value for the V2-V1 function on the Lung Volumes channel is the forced expiratory volume at one second.
Compare the FEV1/FVC ratio of the subject to the normal values of 0.80 and 0.95, respectively, for young healthy adults. This ratio decreases with age.
Table 1
Normal Values (mls) (Average Size human male, 70kg)
At Rest After Exercise Tidal Volume (TV) 500 Expiratory Reserve Volume (ERV) 1200 Inspiratory Reserve Volume (IRV) 3100 Forced Vital Capacity (FVC) 4800 FEV1 (80% of the FVC within 1 sec)
3840 FEV1/FVC 0.80 - In obstructive airway diseases, like asthma, bronchitis, or emphysema, both FVC and FEV1 are reduced, and FEV1/FVC ratios are usually less than 0.70.
- In restrictive lung diseases, like fibrosis, FVC is reduced. But, because of the low compliance and high recoil of the lungs, the FEV1/FVC ratio may be normal (~0.80) or greater than normal (>0.85).
-
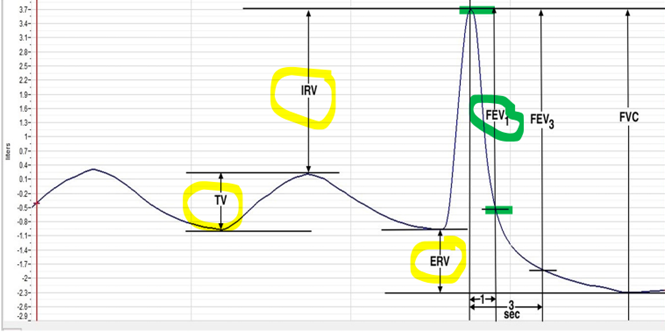
Figure 3: Breathing at Rest. (Figure by iWorx)
Activity 2: Breathing Immediately After Exercise
Aim: to measure breathing parameters of the same healthy subject after exercise.
Approximately Time: 30 minutes
Procedure
- In this exercise, use the same healthy subject whose breathing parameters at rest were measured in Activity 1.
- Type After Exercise in the Mark Box.
- The subject should exercise to sufficiently elevate breathing rate, but with minimal class disruption. Use the treadmills or exercise bikes are a good method. The subject should sit down immediately after the exercise period. Repeat the same procedure done in Activity 1.
- Click Record. After waiting ten seconds have the subject place the flow head in his or her mouth and begin breathing. Click the mark button to mark the recording.
- Click the AutoScale All button. Record at least five-six breaths as the subject is recovering from exercise. Remember the baseline of the Lung Volume channel automatically resets every sixty seconds.
- Click Stop to halt recording.
Data Analysis-Forced Expiration After Exercise
- Perform the same types of measurements on the data recorded in Activity 1. Record the measurements in the table 1 under After Exercise.
- Using Excel, make a graph comparing your spirometry values after exercise versus at rest for TV, IRV, ERV and VC
Turn off the IXTA unit when finished, and properly discard all disposable kit items (blue filter, cardboard mouthpiece, and nose clip).
This Week’s focus for the POPS Project Includes:
- Students will collaborate on the Results for peer editing.
- Results section due next week.
- POPS Check-off: Discussion/Conclusion
- Student responsible for the Discussion/Conclusion section of POPS project should bring it to our next week lab for peer editing. Student name is listed under the Timeline for Completion in the “Plan and Schedule Assignment”, which outlines your roles for the project.
- Poster Design and Submission due in two weeks.
