8.2 Lab Protocol
Approximate Time: 3 hours
Learning Objectives
-
- Key Cardiovascular Terms: Define action potential, AV node, bundle of His, depolarize, ECG, P wave, Purkinje Fibers, plateau stage, QRS complex, refractory period, repolarize, resting potential, T wave, SA node, bulk flow, cardiac output, heart rate, stroke volume, MAP, systolic pressure, diastolic pressure, pressure, and resistance.
- Body Posture and Heart Function: Understand the effect of body posture on heart function.
- Exercise and Heart Function: Understand and measure the effect of exercise on heart function.
- Heart Electrical Conduction System: Understand and describe the electrical conduction system of the heart.
- Cardiac Action Potential: Understand the cardiac action potential.
- ECG as a Measurement Tool: Understand and use the ECG as a physiological measurement tool.
- Hematocrit Determination: Understand and carry out the determination of hematocrit.
- Blood Typing: Understand and perform a blood typing test.
- POPS Project: Start analyzing data.
“This material is adapted from iWorx Systems Inc with permission.”
Equipment Required
IXTA, and power supply for IXTA
ROAM ECG
Alcohol swabs
Disposable ECG electrodes
Setup
Note: The student should make sure that all jewelry from their body has been removed. Please move all electronic devices away from the equipment as this may interfere with the signal (unplugged laptops, tablets, phones, smart watches, etc.)
Note: Disconnect the subject from the IXTA prior to powering off the device.
- Use an alcohol swab to clean the areas where the electrodes will be attached. Make sure these areas are dry before attaching the electrodes.
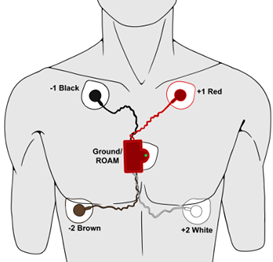
- Remove the plastic covering from the five disposable electrodes and apply an electrode to the scrubbed areas as shown in the picture below.
- Remove the Wireless ROAM from the iWorx unit and place the electrodes so that:
Red lead (cable) is attached under the left clavicle (top Left).
Black cable is attached under the right clavicle (top right).
White cable is attached to the bottom left.
Brown cable is attached to the bottom right.
Snap the wireless ROAM to the fifth electrode as shown in the picture.
Note: females can position the fifth electrode in between the red and black lead – making a horizontal line.
Students are encouraged to go the restroom to put the electrodes on themselves.

- Instruct the subject to sit quietly with their hands in their lap. If the subject moves, the ECG trace will move off the top or bottom of the screen. If the subject moves any muscles in the arms or upper body, electromyograms (EMGs) from the muscles will appear on the ECG recording as noise.
Start the Software
- Turn on the iWorx TA-ROAM box.
- Click the Labscribe25icon on the computer screen.
- A default mode box will appear, click OK. A pop-up box should appear indication that the iWorx IX-TA ROAM (hardware) has been found, click.
- When the program opens, Click on Settingson the toolbar on top. Select Human Heart, Wireless ROAM, and then SixLeadECG-ROAM.
- LabScribe will appear on the computer screen as configured by the SixLead ECG settings.
- Your screen will have graphs specific to your recording. You will notice that each graph is color coded. A blue background bar indicates live data being recorded directly from the subject. A light green background bar signifies calculated data derived from other recorded channels. Your primary focus for this lab should be on the graphs with blue background bars.
Activity 1: Six Lead ECG from Resting Subject
Aim: to record a Six Lead ECG from a resting subject
Approximately Time: 15 minutes
Procedure
- Change the Display Time to 15 seconds.
- Label Resting Subject 1on the Mark box. Click the Mark button to attach the comment to the data.
- Click on the Record button. Continue to record for at least 5 minutes.
- Click on the Auto ScaleAll button. Your recording should like the figure below.
If the signal on the Lead I and Lead II channels is upside down when compared to trace, click on the downward arrow to the left of the channel title and select the Invert function. The trace should now look like the one in the figure.
- Click Stop to halt recording.
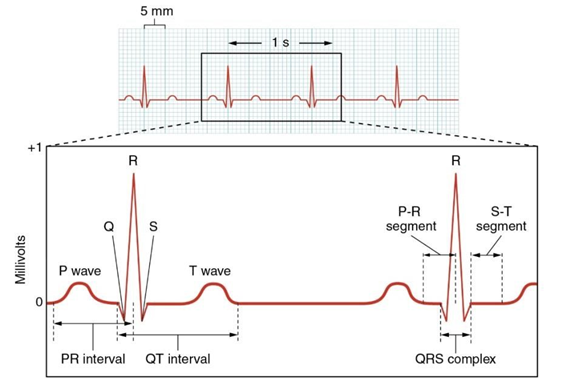
- You are now ready to analyze the data. Scroll through the recording to locate a section with five consecutive, well-defined ECG cycles.
- Use the Zoom Between Cursors icon to display the complete ECG cycles in the main window.
- Click on the Analysis icon. The mathematical functions, V2-V1 and T2-T1 will appear at the top of each graph. T2- T1 represents the time interval between two selected points.
- Position the two cursors correctly to determine the time interval of each wave withing an ECG cycle. Record these time intervals in the tables below.
- Use the mouse to click and drag the cursors to specific points on the ECG recording to measure the following intervals. Be sure to analyze at least three ECG cycles. between two locations.
- PR Interval: To measure this interval, place one cursor at the beginning of the P wave and the second cursor at the center of the R wave. The value for T2-T1 on the ECG channel is the PR interval. Measure this interval for two more ECG cycles, then calculate the average across all three cycles.
| Lead | PR Interval #1 | PR Interval #2 | PR Interval #3 | PR Interval Average |
|---|---|---|---|---|
| II |
- QT Interval: To measure this time interval, place one cursor at the beginning of the Q wave and the second cursor at the end of the T wave. The value for T2-T1 on the ECG channel is the QT interval. Measure this time interval for two additional ECG cycles, and then calculate the average.
| Lead | QT Interval #1 | QT Interval #2 | QT Interval #3 | QT Interval Average |
|---|---|---|---|---|
| II |
- QRS Complex Interval: to measure this interval, place one cursor at the beginning of Q and the second cursor at the end of S. Measure this time interval for two additional ECG cycles, and then calculate the average.
| Lead | QRS Complex #1 | QRS Complex #2 | QRS Complex #3 | QRS Complex Average |
|---|---|---|---|---|
| II |
- Next, focus on two consecutive ECG cycles to calculate the Heart Rate. Place the first cursor at the peak of the first R wave and the second cursor at the peak of the second R wave. Record the time interval between these points, then use the following formula to determine the heart rate (HR).
HR = 60 seconds
Time Between the Two Cursors (R to R)

12. Enter the recorded values in the chart below.
| Heart Rate | PR Interval | QT Interval | QRS Interval | |
|---|---|---|---|---|
| Normal Values | 60-100 bpm | 120-200 ms | 300-450 ms | 60-100 ms |
| Your Values |
Activity 2: Effect of Body Posture on Heart Function
To determine blood pressure:
Place a pressure cuff around the upper arm 1 inch above the junction of the elbow. Inflate the cuff to approximately 160 mmHg to completely occlude the brachial artery. While listening with the stethoscope’s diaphragm over the brachial artery distal to the occlusion, slowly release, at approximately 3 mm Hg/second, the pressure until an intermittent sound is heard. This first sound indicates systolic pressure. Continue to release the pressure until the sound disappears. The point at which the sound disappears indicates the diastolic pressure.
Warning: This procedure involves stopping blood flow to the arm, which is potentially dangerous. If there are enough students in the lab with experience in this procedure, they may assist inexperienced students. Please take the following precautions:
- Know what you are doing ahead of time.
- Do not leave the cuff inflated for any prolonged period of time (>30 seconds).
- The volunteer should flex and extend their fingers between experiments to maintain blood flow.
- This experiment should be performed on healthy individuals who do not have a personal or family history of cardiovascular or respiratory disease.
To determine pulse:
We will determine pulse rates manually and with the pulse oximeter. To take a manual pulse, place your fingers (not your thumb) on the thumb side of your partner’s wrist at the radial artery. Place the pulse oximeter on a finger on that hand. Count the pulse for 15 seconds and multiply this number by 4 to obtain the beats per minute. The pulse can also be monitored on the neck (carotid artery).
Caution: great pressure is not required to monitor the pulse, and, in fact, too much pressure may produce a change in the pulse rate. Never monitor a subject’s pulse with your thumb because you may feel YOUR OWN pulse, from the artery in the thumb.
Measure you and your partner’s pulse and blood pressure in three different conditions:
Supine (after 10 minutes), standing (immediate), and standing (after 5 minutes). Determine your pulse both manually and with the pulse oximeter, while your lab partner determines your blood pressure and records data on your datasheet. For each of the pulse rate determinations, obtain an average of 3 separate recordings (for each), and record it in the spaces provided. Then switch and take readings on your lab partner.
| Pulse (bpm)
Manual |
Average supine HR (bpm)
as stated in articles found here: NIH articleLinks to an external site. ScienceDirect articleLinks to an external site. |
Pulse (bpm)
Pulse Oximeter |
Blood Pressure (mmHg) | Average BP (mmHg) | |
|---|---|---|---|---|---|
| Supine (10 minutes) | 72.2 | ||||
| Standing (immediate) | increase of 30 bpm from supine bpm | ||||
| Standing (5 minutes) | 76.3 |
Activity 3: Effect of Exercise on Heart Function (done as a group)
- Record the normal resting (standing) pulse rate (using the pulse oximeter) and blood pressure of a volunteer in the group (Use your standing 5-minute values from Activity 1) under ‘Normal’ on the data sheet.
- With the deflated pressure cuff in place, have the group’s volunteer perform a standard exercise for one minute using a step-up test, squats, running in place, jumping jacks, or whatever other exercise you want to do that will increase your heart rate.
**IF YOU FEEL THAT YOU SHOULD NOT DO THIS EXERCISE ACTIVITY, PLEASE FEEL FREE TO OPT OUT OF IT.
- After exercise, the volunteer will monitor his or her own pulse rate (using the pulse oximeter) while you monitor his or her blood pressure. After one minute of exercise the subject stops and the pulse rate and blood pressure are monitored immediately.
- Continue to determine the pulse rate every 15 seconds for two minutes or until the recovery heart rate reaches the pre-exercise value. Determine the blood pressure at one minute and two minutes following exercise.
Record your results:
| Pulse (bpm) | Systolic Pressure (mmHg) | Diastolic Pressure (mmHg) | |||
|---|---|---|---|---|---|
| Normal | |||||
| Immediately After Exercise
(Time=0) |
|||||
| 0 Sec | |||||
| 15 Sec | |||||
| 30 Sec | |||||
| 45 Sec | |||||
| 60 Sec | |||||
| 75 Sec | |||||
| 90 Sec | |||||
| 105 Sec | |||||
| 120 Sec |
Continue taking readings until normal values are reached:
| Time necessary to reach normal pulse | |
|---|---|
| Time necessary to reach normal blood pressure |
Activity 4: Blood typing
Your lab instructor will show a video demonstrating the correct procedure for performing the blood typing test.
Health and Safety Training for Biology 2425-Physiology Labs involving human blood.
- It is required for Lab Instructors to teach students the importance of handling blood in a safe manner. Students who fail to follow the rules will be expelled from class.
- Human blood can potentially contain blood borne viruses, such as HIV and hepatitis. Working with blood therefore carries a risk of infection if blood is not handled with care.
- Do not touch or come into contact with another student’s blood. Students should handle only their own blood!
- Students that do not feel comfortable with obtaining a small sample of their own blood can complete the lab activity by using the alternate sheep blood instead.
- The Lab Instructor and students are required to wear laboratory coat, gloves, and safety goggles always through the entire lab.
- Lab Instructor will introduce the equipment being used and demonstrate how to use the equipment.
**DO NOT PERFORM THE BLOOD LAB ACTIVITIES IF YOU HAVE ANY OF THE FOLLOWING CONDITIONS:
- Bleeding disorders such as hemophilia or thrombocytopenia
- A blood-borne infectious disease such as HIV or Hepatitis.
- Individuals with a history of thrombosis, stroke, or liver disease.
- Individuals taking anticoagulant medication.
Salt Lake Community College has a Bloodborne Pathogen Policy that can be found at
http://i.slcc.edu/facilities/docs/BLOODBORNE_PATHOGEN_POLICY_Oct_2011_RW.pdfLinks to an external site.
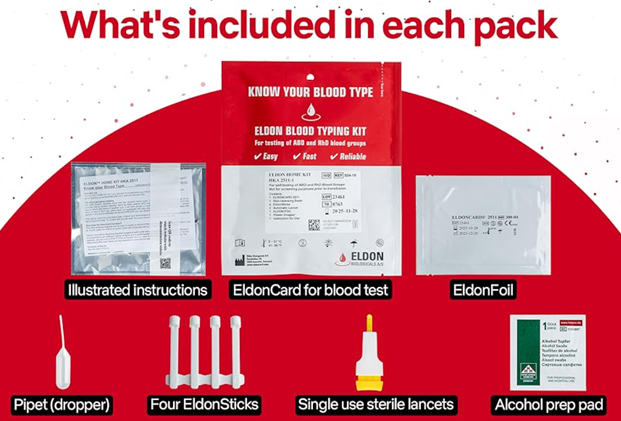
Procedure: Please read and follow all instructions enclosed in your blood typing kit. Your kit is only meant for your use, do NOT share your kit with another.

Safety Procedures:
- Clean the table with a disinfectant solution and wipe it down with paper towels both before and after lab.
- Wear safety goggles during the entire lab.
- Work alone at your “assigned area”.
- Wipe your thumb or finger with a sterile alcohol swab and allow the skin to dry.
- The alcohol swab wrappers and band-aids wrappers need to be disposed in the biohazard bag.
- Uncover the sterile lancet. Once used, dispose of the lancet into the sharps container immediately. DO NOT REUSE LANCETS!!
- Anything contaminated with blood need to be disposed in the biohazard bag.
- Notify your instructor if sharps container or biohazard bag is getting full.
- Notify your instructor if you accidentally discard something in the wrong container.
- Keep your work area clean and uncluttered.
- Wash your hands immediately before leaving the lab.
SPECIFIC DISPOSAL
|
SHARPS CONTAINER
|
BIOHAZARD BAG
(For disposal of anything contaminated with blood) |
Garbage Bag |
|---|---|---|
| Lancets | Gloves | Directions |
| Capillary tubes | Paper towels | Wrapping |
| Alcohol swabs | ||
| Contaminated paper towels | ||
| Alcohol swabs wrappers | ||
| Band-aids wrappers | ||
| EldonCard |
***STUDENTS WHO DID NOT SIGN THE CONSENT FORM MAY FOLLOW THE ALTERNATIVE BLOOD PROCEDURE AVAILABLE IN THE LAB
Imagine you worked with blood transfusions and had patients with the blood types listed below. Please select the answer which includes ALL blood types of each patient COULD receive. (make sure you read all possible answers before selecting)
| Patient Blood Type | Blood Types Patient can receive |
|---|---|
| A+ | |
| B- | |
| AB+ | |
| O- |
Activity 5: Determination of Blood Hematocrit
***In this activity, you will determine the hematocrit using capillary tubes and a centrifuge. ONLY one member of each group will be doing this activity. To avoid contamination, your instructor will be running the centrifuge.
Hematocrit Determination
- Place the blood samples in the heparinized capillary tubes into a numbered radial slot position of a centrifuge fitted with a capillary tube head. Position the capillary tube with the clay seal away from the center of the capillary tube head. Remember the number of the position of your capillary tube. When the head is filled with capillary tubes carefully screw down the cover of the centrifuge and spin the samples for 3 minutes (this will be run by your instructor).
- When the centrifuge has stopped spinning (Caution: allow the head to stop of its own momentum and do not try to stop it sooner, or you might re-mix the solution), take your (check your number) capillary tube and hold it vertically with the clay-sealed end down. Observe the upper clear plasma, the lower portion of packed red blood cells (RBCs), and the thin boundary of white blood cells (WBCs) that separates the RBCs from the plasma. Another precaution: after you remove the capillary tube from the centrifuge read the hematocrit as soon as possible. If that is not possible, store the capillary tube in a vertical position.
- To determine the Hct of your sample use a small plastic ruler to measure to the closest estimated fraction of a millimeter: A) Measure the height of the whole blood column of from the clay/blood junction at the bottom of the tube to the meniscus of the plasma at the top of the blood column. Record the total height of the whole blood column on the data sheet. B) Next measure the height of the column of packed RBCs from the clay/blood junction at the bottom of the tube to the top of the RBCs at the WBC/RBC junction. Record the height of the RBC column on the data sheet.
From these values calculate the Hct by the formula:
Hct = (height of RBC column / height of whole blood column) X 100
Hematocrit Determination
| Height of RBC column | |
|---|---|
| Height of whole blood column | |
| Hematocrit |
This Week’s focus for the POPS Project Includes:
- Start analyzing collected data.
- POPS Check-off: Results
- Student responsible for the Results section of POPS project should bring it to our next week lab for peer editing. Student name is listed under the Timeline for Completion in the “Plan and Schedule Assignment”, which outlines your roles for the project.

