
4 Lab Protocol: Introduction to Microscopes
Exercise 1 Parts of a Compound Light Microscope
Obtain a compound light microscope and identify the following parts:
- Stage and stage clip which are the platform on which the slide is placed and the clip which holds the slide in place.
- There are also two knobs that adjust the location of the slide over the condenser (light source). One moves the stage side to side, the other moves the stage front to back and vice versa.
- Ocular lenses which the person will look through to see the image. The ocular lenses have a magnification power of 10X. The distance between the ocular lenses can be adjusted according to the distance between the scientist’s eyes.
- The four objective lenses are located just above the stage. The scientist can choose which objective lens to use at a given time by rotating the nosepiece to a particular position. The magnification power of these lenses varies from microscope to microscope. We have microscopes with 4X, 10X, 40X, and 100X objective lenses as well as microscopes with 10X, 40X, 66X and 100X objective lenses.
- The course and fine focus knobs which move the stage up (closer to the objective lens) or down (further away from the objective lens). It is important that the course focus knob, which moves the stage quickly, should only be used with the lowest power objective lens.
- The light source can be adjusted using an iris diaphragm or dimmer knob. Adjustment is helpful according to the specimen and the magnification used.
Exercise 2 Using the compound light microscope by viewing a slide with the letter “e”
- Make sure the objective lens being used is at the lowest power (4X or 10X, depending on the microscope).
- Place a prepared slide of the letter “e” on the microscope stage right side up and secure with the clip.
- Turn on the light to the microscope. Without using the ocular lenses, use the stage adjustment knobs to position the letter “e” directly above the light source.
- View the specimen through the microscope and use the stage adjustment knobs to center the “e” within the field of view and the course focus knob to bring it into focus. Using the iris diaphragm or dimmer switch, adjust the light intensity so that it is comfortable to your eyes.
- When initially focusing, it may be best to start with the objective lens as far from the slide as possible and then to move it closer and closer until you can see the “e” roughly in focus. Now use the fine focus knob to bring the “e” into sharp focus.
A. What is the orientation of the letter “e” in the field of view?
B. In which direction does the “e” move within the field of view when you move the stage to the left?
C. In which direction does the “e” move within the field of view when you move the stage closer to you?
6. Turn the nosepiece to change the objective lens to the next higher power. Without making any adjustments, view the “e” through the microscope. You should still be able to see the letter “e” or part of the letter “e” roughly in focus. Microscopes are built such that they are “par-centered” which means that the specimen will remain centered in the field of view after switching objective lenses. Microscopes are also built such that they are “par-focused” meaning that the specimen will remain roughly in focus after switching objective lenses. Thus, one will only need to make minor adjustments using the fine focus knob and stage adjustment knobs.
7. Increase the magnification again by switching to the next objective lens. Re-center and re-focus the microscope. We will not be using the 100X objective lens today.
Excercise 3 Calculating the total magnification
When lenses are coupled in a microscope, the total magnification is calculated using the formula: The ocular magnification on the microscopes you are using at SLCC is 10 times.
Total Magnification = Ocular Magnification X Objective Magnification
Calculate the 4 total magnifications that are possible with the microscope you are using to complete the table below.
|
Ocular Magnification |
Objective Magnification |
Total Magnification |
|
|
|
|
|
|
|
|
|
|
|
|
|
|
|
|
Exercise 4 Calibrating the Ocular Micrometer using a Stage Micrometer
- Ensure your microscop is set to the lowest objective lens.
- Load the stage micrometer slide onto your stage and ensure it is secure in the stage clip of your microscope.
- Turn on your light source and use the knobs to find and focus on the stage micrometer at the lowest magnification.
- Align the stage micrometer and the ocular micrometer so that the 0 tick mark are exactly aligned with each other.
- The stage micrometer is calibrated to 0.01 mm or 10 µm for each division or individual tick mark, you can measure the distance between individual tick marks and numbered tick marks on the ocular micrometer using the stage micrometer as your ruler.
- Complete the table below to indicate the distance between tick marks at each objective magnifcation. Once you have established the distance between tick marks, you can use this information to measure various specimens throughout the semester.
- You can also calcular the diameter or the field of view (FOVd) for each of the objective lenses on your microscope. The best way to do this is to use the 40X objective lens and measure the diameter using the stage micrometer. Be sure to indicate the proper unit of measurement.
| Objective lens magnification | Distance between individual tick marks | Distance between numbered tick marks | Diameter of the field of view |
Exercise 5 Exploring the relationship between depth of field and magnification using cross fiber slides
Depth of Field refers to how much of the thickness of an object can be brought into focus at the same time. A low depth of field means only a small fraction of the specimen’s height will be in focus at a time.
- Place the cross fiber slide onto your microscope and view at the lowest magnification.
- Determine how many different threads appear in sharp focus at the same time and record on the table below.
- Examine the slide at the one or two higher levels of magnification and do the same. You will not use the 63X objective lens for this exercise.
-
-
- The depth of field (decreases, remains the same, increases) as the magnification is increased.
-
-
- Continue viewing the slide of the cross threads at different magnification and pay attention to how the brightness changes.
-
-
- As the magnification increases, [less, the same, more] illumination is needed to maintain the same brightness.
- As the magnification increases, [less, the same, more] illumination is needed to maintain the same brightness.
-
-
|
Magnification |
How many threads are in focus? |
|
|
|
|
|
|
|
|
|
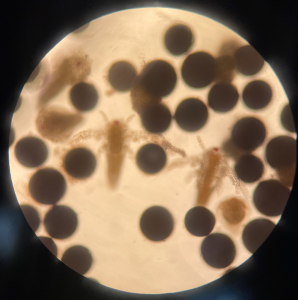
Exercise 6 Estimating relative size of an object
In the previous exercises, you calibrated your ocular micrometer so that you can use it to measure specimen through the microscope. In this case, we will be looking at a sample of brine shrimp and brine shrimp eggs to measure their size.
- Prepare a wet mount slide from the sample provided by your instructor. You should use the pipette to mix the solution of brine shrimp to suspend the organisms as they usually settle on the bottom of the container.
- Mount your prepared slide on the stage of the microscope and use proper technique to locate a place on the slide where you can observe several brine shrimp eggs.
- Take note of which magnification you are using and calculate the size of the shrimp eggs using the measurements you performed in exercise 4.
Exercise 7 Practice using a dissecting scope by viewing a penny, fruit fly, and starfish
- Place the penny on the platform of the dissecting scope such that it is right side up. Turn on the light source.
- Now view the penny with the highest magnification possible. What is this magnification?
- Determine the field of view’s diameter at the lowest and highest magnification using the ruler.
- Using the highest magnification which still allows you to see an entire fruit fly, measure the length and width of a fruit fly.
- Draw a diagram of the underside of a starfish showing the tube feet of one of the arms. Include a size bar on your diagram.
