2 Introduction to Microscopes

A microscope is an instrument that magnifies an object so that it may be seen by the observer. Because cells are usually too small to see with the naked eye, a microscope is an essential tool in the field of biology. In addition to magnification, microscopes also provide resolution, which is the ability to distinguish two nearby objects as separate. A combination of magnification and resolution is necessary to clearly view specimens under the microscope. In this lab, parts of the microscope will be reviewed. Students will learn proper use and care of the microscope and observe samples from pond water.


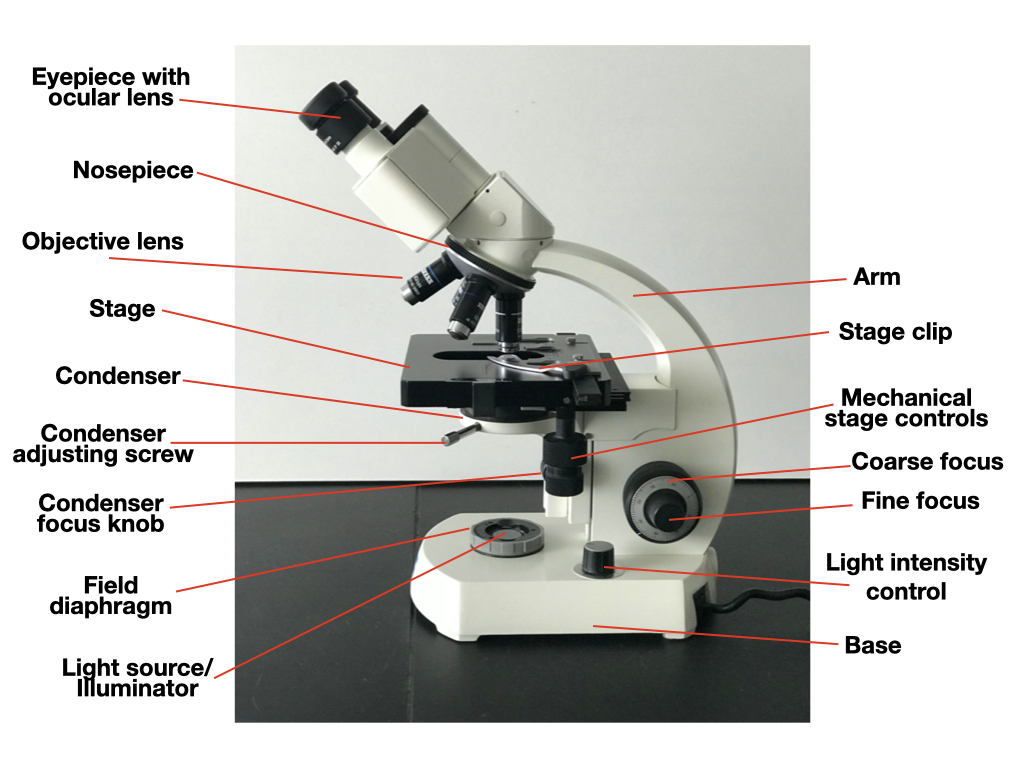
“Parts of a microscope” by Melissa HardySalt Lake Community College is licensed under CC BY-NC 4.0 / A derivative from the original work

A microscope magnifies the image of an object through a series of lenses. The condenser lens focuses the light from the microscope’s lamp onto the specimen. The light then passes through the object and is refracted by the objective lens. The objective lens is the more powerful lens of a microscope and is closest to the object. The light then travels to the ocular lens , which focuses the image onto the user’s eye. Usually, the power of the ocular lens is fixed for a given microscope.

Magnification

Your microscope has 4 objective lenses. On most of the student microscopes, these are 10x, 40x, 63x, and 100x (Oil Immersion). The number indicates the magnification, e.g., the 10x objective will magnify an object by 10 times. Look at each objective lens on the microscope, and write down the magnification of each lens in the table below.

In addition to the objective lenses, the ocular lens (eyepiece) has a magnification. Look at the eyepiece magnification on your microscope and write down the magnification below.

The total magnification is determined by multiplying the magnification of the ocular and objective lenses.  For instance, if the ocular lens has a magnification of 20x and the objective lens being used has a magnification of 4x, the total magnification will be 80x.

Ocular Magnification

Objective Magnification

Total Magnification


Resolution

The number after the magnification on an objective lens indicates the numerical aperture. This is a measure of the light-gathering ability of the objective lens. It is closely related to resolution. The higher the numerical aperture, the higher the resolution. A higher numerical aperture also means a shallower depth of field. It also requires a shorter working distance (i.e., you must get the objective lens closer to the specimen).

Resolution is also dependent upon the wavelength of light used to illuminate the specimen. Recall that the visible light spectrum (for humans) ranges from about 400 nm to 700 nm.

Visible light spectrum showing the colors of light from about 380 nanometers in violet to 750 nanometers in red, with the colors blue, green, yellow, and orange in between from shortest to longest wavelength.

The visible light spectrum shown from shortest wavelength to longest wavelength. Humans can detect electromagnetic radiation as visible light between about 400 and 700 nanometers. (Figure is in the public domain).

Exercise 1 Parts of a Compound Light Microscope

Obtain a compound light microscope and identify the following parts:

Stage and stage clip which are the platform on which the slide is placed and the clip which holds the slide in place. There are also two knobs that adjust the location of the slide over the condenser (light source). One moves the stage side to side, the other moves the stage front to back and vice versa.

Ocular lenses which the person will look through to see the image. The ocular lenses have a magnification power of 10X. The distance between the ocular lenses can be adjusted according to the distance between the scientist’s eyes.

The four objective lenses are located just above the stage. The scientist can choose which objective lens to use at a given time by rotating the nosepiece to a particular position. The magnification power of these lenses varies from microscope to microscope. We have microscopes with 4X, 10X, 40X, and 100X objective lenses as well as microscopes with 10X, 40X, 66X and 100X objective lenses.


The course and fine focus knobs which move the stage up (closer to the objective lens) or down (further away from the objective lens). It is important that the course focus knob, which moves the stage quickly, should only be used with the lowest power objective lens.


The light source can be adjusted using an iris diaphragm or dimmer knob. Adjustment is helpful according to the specimen and the magnification used.


Exercise 2 Practice using the compound light microscope by viewing a slide with the letter e” 

Make sure the objective lens being used is at the lowest power (4X or 10X, depending on the microscope). Place a prepared slide of the letter “e” on the microscope stage right side up and secure with the clip. Turn on the light to the microscope. Without using the ocular lenses, use the stage adjustment knobs to position the letter “e” directly above the light source.

Now view the specimen through the microscope and use the stage adjustment knobs to center the “e” within the field of view and the course focus knob to bring it into focus. Using the iris diaphragm or dimmer switch, adjust the light intensity so that it is comfortable to your eyes. When initially focusing, it may be best to start with the objective lens as far from the slide as possible and then to move it closer and closer until you can see the “e” roughly in focus. Now use the fine focus knob to bring the “e” into sharp focus.


A. What is the orientation of the letter “e” in the field of view?

B. In which direction does the “e” move within the field of view when you move the stage to the left?

C. In which direction does the “e” move within the field of view when you move the stage closer to you?


Turn the nosepiece to change the objective lens to the next higher power. Without making any adjustments, view the “e” through the microscope. You should still be able to see the letter “e” or part of the letter “e” roughly in focus. Microscopes are built such that they are “par-centered” which means that the specimen will remain centered in the field of view after switching objective lenses. Microscopes are also built such that they are “par-focused” meaning that the specimen will remain roughly in focus after switching objective lenses. Thus, one will only need to make minor adjustments using the fine focus knob and stage adjustment knobs.

Increase the magnification again by switching to the next objective lens. Re-center and re-focus the microscope. We will not be using the 100X objective lens today.


Excercise 3 Calculating the total magnification

When lenses are coupled in a microscope, the total magnification is calculated using the formula:   Total Magnification = Ocular Magnification X  Objective Magnification  

Calculate the 4 total magnifications that are possible with the microscope you are using to complete the table below.

Ocular Magnification

Objective Magnification

Total Magnification


Exercise 4 Determining the diameter (FOVd) and the area (FOVa) of the field of view  

To use a clear ruler to determine the diameter of the field of view for the lowest power objective lens, place the ruler on the microscope stage the same way you would place a slide. In this way, you can use the stage adjustment knobs to position the ruler exactly the way you would like. Focus on the mm markings on the ruler placing one mark at the extreme left position in the field of view. Now count the number of intervals between gradations that you can see in the field of view. This number is the diameter of the field of view in mm.


To determine the diameter of the field of view for higher power objective magnifications (Mag), we will use the mathematical formula:  FOVd1 X Mag1 = FOVd2 X Mag2


FOVd1 and Mag1 would be based on the lowest power objective (or total magnification), Mag2 would be based on the higher power objective (or total magnification), and FOVd2 is what we are trying to calculate.


Complete the table below to indicate the FOVd for each of the objective lenses on your microscope. Be sure to indicate the proper unit of measurement. Note that if the magnification is increased two-fold, the diameter is reduced two-fold.

Objective lens magnification

FOVd

radius

FOV


The area of a circle is calculated using the formula: area = πr2


Therefore, calculate the radius of each circle by dividing the corresponding diameter by 2 and include in the table above. π is roughly equal to 3.14; therefore, calculate the area of the field of view (FOVa) by multiplying 3.14 x radius x radius and enter in the last column of the table. Be sure to include the proper unit of measurement. Note that if the magnification is increased two-fold, the FOVa is decreased 4-fold.


Exercise 4 Exploring the relationship between depth of field and magnification

Depth of Field refers to how much of the thickness of an object can be brought into focus at the same time. A low depth of field means only a small fraction of the specimen’s height will be in focus at a time. Place the cross thread slide onto your microscope and view at the lowest magnification. Determine how many different threads appear in sharp focus at the same time and record on the table below. Examine the slide at the two higher levels of magnification and do the same.


Magnification

How many threads are in focus?


Complete the following statement by choosing the correct option: The depth of field (decreases, remains the same, increases) as the magnification is increased.


Exploring the relationship between magnification and amount of light needed

Continue viewing the slide of the cross threads at different magnification and pay attention to how the brightness changes.

Complete the following statement by choosing the correct option: As the magnification increases, (less, the same, more) illumination is needed to maintain the same brightness.


Exercise 5 Calculate the size of an object based on the proportion of the field of view it occupies

Photo taken with 10X objective lens (100X total magnification)

View through a light microscope showing a cluster of dark cicular structures which are brine shrimp eggs magnified at 100x. There are two clearly visible brine shrimp in the center of the image and a third one on the upper left that is blurry.
Brine shrimp and brine shimp eggs by Jovana Bustillos and Amelia Hall SLCC Spring 2024.


Take the following 3 measurements of the photo using a ruler:

Length of brine shrimp =

Width of brine shrimp =

Diameter of circle representing the field of view =

The photo was taken at 100X magnification (10X objective lens). What is the actual diameter of the field of view at this magnification?


We will now multiply the ratio between the length of the brine shrimp and the diameter of the field of view by the actual diameter of the field of view for the given magnification. We then do the same for the width.


Actual height = height in photo   x   FOVd

                                   diameter of circle

Show your work to calculate the length and width of the brine shrimp viewed under the microscope.


Length:


Width:


Exercise 6 Practice using a dissecting scope by viewing a penny, fruit fly, and starfish

Place the penny on the platform of the dissecting scope such that it is right side up. Turn on the light source.

Does the light shine on the penny from above or below?

View the penny with the lowest magnification possible. What is this magnification?


When viewing the penny through the microscope, does it appear right side up or upside down?


Now view the penny with the highest magnification possible. What is this magnification?


Determine the field of view’s diameter at the lowest and highest magnification using the ruler.


Using the highest magnification which still allows you to see an entire fruit fly, measure the length and width of a fruit fly.


Draw a diagram of the underside of a starfish showing the tube feet of one of the arms. Include a size bar on your diagram.


License

Icon for the Creative Commons Attribution 4.0 International License

Introduction to Microscopes Copyright © by Dalia Salloum is licensed under a Creative Commons Attribution 4.0 International License, except where otherwise noted.

Share This Book