
Lab Protocol: The Cell
Last week we practiced using a compound light microscope and a dissecting microscope and calibrated the ocular micrometer using a stage micrometer. This week, our goal will be to compare the cells from different organisms representing the three domains of life. We will focus on the sizes and shapes of cells and on identifying the subcellular structures that we can see under the microscope.
Safety Precautions
● Be careful when handling glass slides, the edges may be sharp.
● Dispose of used cover slips in a glass disposal box.
● Observe proper use of the microscope; avoid handling the electric cord with wet hands.
● Do not use the coarse adjustment knob of the microscope at higher magnifications.
● Inform your teacher immediately of any broken glassware as it could cause injuries.
● Wash your hands with soap and water after handling live organisms.
●Used cotton swabs are considered biohazard; dispose of swabs in the biohazard trash container as soon as you
have used them.
● Methylene blue is a dye; be cautious not to ingest methylene blue.
Exercise 1 Observing microorganisms in prepared slides
Obtain a light microscope and coordinate with your group members so that each member will view a different slide. There are prepared slides of various microorganisms at the front of the lab room. Spend time finding and identifying them using proper techinique with the light microscope. This should not take longer than 30 minutes.
Exercise 2 Observing microorganisms in pond water
In this simple experiment, you will prepare a wet mount slide to view and compare several different cell types using a light microscope. In lecture, you learned about the three domains of life, and you learned about prokaryotic and eukaryotic cells. Now it is time to see them in action!
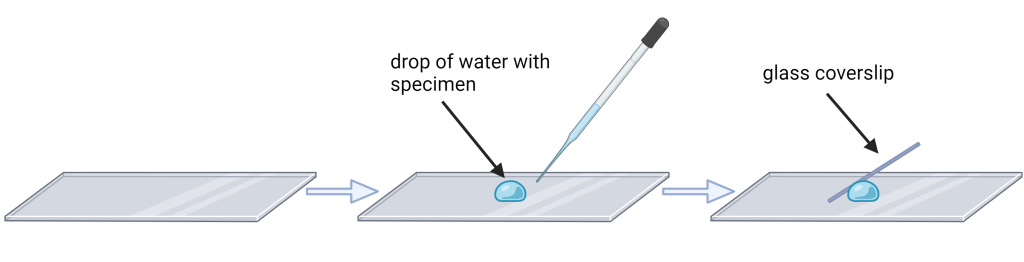
To prepare a wet mount you will use a glass microscope slide, water, and a cover slip. A cover slip is important whenever viewing a specimen to prevent dirtying the microscope lens, to slow the evaporation of the sample, and to flatten out the sample. You will observe Ideally, each table will have four microscopes set up with one organism at each microscope.
A good technique for preparing the slide:
- Mix the pond water in the beaker at your table by pulling up and blowing out liquid several times using a transfer bulb before placing a single drop of the liquid on the microscope slide.
- Place the coverslip on the microscope slide close to the droplet and lower slowly to cover the specimen (see figure below). It may take some practice to reduce the number of air bubbles trapped under the cover slip.
- Remove excess liquid using a Kim wipe. The slide is now ready to be placed on the microscope for viewing.
A good technique for finding the specimen under the microscope:
- Place the microscope slide on the stage and secure using the stage clip. Be sure to gently close the stage clip to avoid breaking the microscope slide.
- Turn on the light source and begin scanning the slide using the low power objective to search for organisms.
- Once a specimen of interest has been located, use a higher power objective lens to see increased detail. You may want to use a drop of Proto-Slo if the protists are moving too quickly.
- Shift to the highest magnification that allows you to see the entire organism or cell then you may begin determining the specimen’s size.The appropriate magnification will be the highest power objective that still allows one to see an entire organism at once (likely to be 40X or 63X). Note that we will not be using the 100X objective lens that requires immersion oil.
- Record your data in your Student Data Sheet.
Exercise 3 Staining a wet mount slide
Stains are used to improve the contrast between different structures in the specimen. You can stain a specimen before or after the placement of the coverslip.
First, you will observe three types of cells without stain and then you will stain them and observe again.
To stain prior to placing the coverslip:
Add a drop of stain instead of or in addition to the droplet of water.
To stain following the placement of the coverslip:
Add a drop of stain to the slide immediately adjacent to the coverslip (make sure that the stain is not on top of the coverslip) and bring it into contact with the liquid underneath the coverslip. Using a Kimwipe as a wick on the other side of the coverslip will cause the stain to flow around the specimen.
Each table of students will prepare three wet mount specimens to stain.
- Onion skin (razor blade to cut and tweezers to peel away skin)
- Human cheek cells (sterile toothpick to harvest)
- Potato tuber (thinly sliced with razor blade)
To prepare a cheek cell slide:
a. Take a clean tooth pick and gently scrape the inside of your mouth.
b. Smear the tooth pick on the center of the microscope slide for 2 to 3 seconds.
c. Add a drop of methylene blue solution (a dye) and place a coverslip on top.
d. Remove any excess solution by allowing a paper towel to touch one side of the coverslip.
e. View the slide at all magnifications.
f. Record your observations as drawings. Use color if present, label the magnification, and estimate the size of the cells in your data sheet.

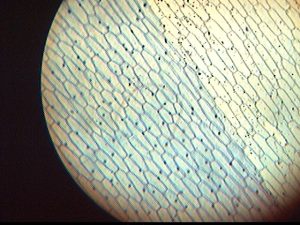
To prepare a potato tuber slide:
a. Take a razor blade and carefully cut away a thin slice of potato.
b. Place the piece of potato on the center of the microscope slide.
c. Add a drop of iodine and place a coverslip on top.
d. Remove any excess solution by allowing a paper towel to touch one side of the coverslip.
e. View the slide at all magnifications.
f. Record your observations as drawings. Use color if present, label the magnification, and estimate the size of the cells in your data sheet.
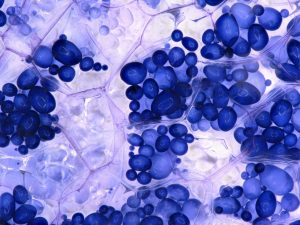
To prepare an onion skin slide:
a. Use a tweezer and carefully peel away a thin slice of onion.
b. Place the piece of onion on the center of the microscope slide.
c. Add a drop of neutral red and place a coverslip on top.
d. Remove any excess solution by allowing a paper towel to touch one side of the coverslip.
e. Wait 5 – 10 minutes prior to viewing. View the slide at all magnifications.
f. Record your observations as drawings. Use color if present, label the magnification, and estimate the size of the cells in your data sheet.
Exercise 4 Determining Size of a Cell
You are now ready to determine the size of the various cells you observed. Remember, in the previous lab, you callibrated the ocular micrometer using a stage micrometer and recorded the distance between numbered tic marks on the ocular micrometer. You will now use those numbers to measure cell size. Be sure to record whether you are measuring length or height of the cell in your Student Data Sheet.
|
Specimen |
Objective lens Magnification |
Distance between numbered tic marks (µm) |
Size of cell |
|
Cheek cells |
|
|
|
|
Potato cells |
|
|
|
|
Onion cells |
|
|
|
Students can now move from microscope to microscope to view the various specimens with minimal microscope adjustment. Each group will draw each type of specimen.
Exercise 5 Viewing a wet mount of an Elodea leaf
Sometimes one can see cells and internal structures without staining. For instance, chloroplasts that contain pigments to harvest energy from sunlight are often easy to see. Prepare a wet mount by pulling off an Elodea leaf (use tweezers) and placing it on a slide with a drop of water and a coverslip. View the specimen at 400X total magnification and answer the following questions:
- How many cells thick is an Elodea leaf? (You will need to adjust the focus of the microscope to view different focal planes)?
- Are the chloroplasts distributed evenly within the cells or are they preferentially located at the periphery of the cells? How might this provide evidence for a large central vacuole in each cell
- Can you see nuclei in these cells?
